
scyorkie
-
Content Count
381 -
Joined
-
Last visited
-
Days Won
1
Posts posted by scyorkie
-
-
Well you need 9.21 CT to start first :)
-
Those sorting options do in fact work for me.
Is your carousel even enabled? carousel.xc > carousel > enabled = true
-
XVM doesn't deal with WN8 on a per-tank basis.
You can however sort by "xtdb", "-xtdb", "xte", or "-xte".
See \res_mods\mods\shared_resources\xvm\doc\macros.txt for what they represent.
-
No problem.
FYI "totalHP" is for the "19700 < 19720" part of the screenshot in your post above.
Edit: I just saw your edits to your earlier posts, and assume that you've managed to make the grey background work and have no other questions that I've missed. Have fun tweaking your configs. :)
-
It's not in that "totalHP" part.
Can you zip up the contents of \res_mods\configs\xvm\ and upload here?
-
 1
1
-
-
Can you upload the zip file that you download from that guy's links?
There are too many ads to jump through / pages to translate.
I'm not interested in clicking through 10+ Russian pages, each with its own popup ads.
-
Can you link the thread/site where you downloaded that from?
-
I have no idea what "totalhp of Enot" refers to. Can you indicate on a screenshot?
-
1. Create a new "call up" in battleLabels.xc:
${ "battleLabelsTemplates.xc":"def.topBarBG" },
2. Create a new definition in battleLabelsTemplates.xc:"topBarBG": {
"enabled": true,
"x": 0, "y": 0, "layer": "bottom",
"height": 32, "width": "{{py:xvm.screenWidth}}",
"bgColor": "0", "alpha": "25"
},3. Change the "height" to whatever you need.
4. The commas after the closing bracket } need to be there unless you insert the above lines at the end of the respective files. If you don't know where to insert the lines, upload your battleLabels.xc and battleLabelsTemplates.xc here (do not copy-paste the contents, but upload the files).
-
It looks like you have more than one mod displaying team HP at the top of the screen.
Can you zip your mods\ and res_mods\ folders, and upload to a file sharing site (Dropbox, Google Drive, etc) for me to download and take a look?
-
Which parts are you having difficulties with? I'm happy to explain more.
-
Ah, ok, I guess some moderator moved your first thread here from the Russian section 'cos I saw both earlier.
No worries! We're all new at some point. Hope you figure out the questions you had about macros. :)
-
1
-
-
1. Please no duplicate threads.
2. {{teff}} and {{e}} are not valid macros. See \res_mods\mods\shared_resources\xvm\doc\macros.txt
-
2
-
-
-
I. What the macros do
1. Before I explain how to customise your labels, do note that none of the macros deal with PLATOON damage. Instead, they deal only with YOUR performance:
{{py: xvm.totalDamagesBlocked}} = your damage dealt + your blocked damage
{{py: xvm.totalDamagesAssist}} = your damage dealt + your assisted damage (tracking/spotting) -- this would be relevant for pushing your MOE%
{{py: xvm.totalDamagesBlockedAssist}} = your damage dealt + your blocked damage + your assisted damage (tracking/spotting)
{{py: xvm.totalDamagesBlockedReceived}} = your damage dealt + your blocked damage + your received damage -- this would be relevant for mission HT.15II. battleLabels.xc and battleLabelsTemplates.xc
2. Labels are activated using 2 separate files in your configs folder: battleLabels.xc "calls up" to the labels you want to display, and battleLabelsTemplates.xc defines these labels.
3. As an example, let's look at the label "totalHP". In battleLabels.xc you see the "call up" line ${ "battleLabelsTemplates.xc":"def.totalHP" }, while in battleLabelsTemplates.xc the definition looks something like this (I've compressed mine into fewer lines):
"totalHP": {
"enabled": true,"updateEvent": "PY(ON_UPDATE_HP)",
"x": 0, "y": 30, "screenHAlign": "center", "align": "center",
"shadow": { "distance": 1, "angle": 90, "alpha": 80, "blur": 5, "strength": 1.5 },
"textFormat": { "font": "mono", "size": 18, "align": "center" },
"format": "{{py:xvm.total_hp.text}}"
},III. Creating your own label
4. To create your own label, let's use the existing "totalHP" as a starting point. You will want to:
a. create a new "call up" in battleLabels.xc: ${ "battleLabelsTemplates.xc":"def.totalDamagesBlocked" },
b. create a new definition in battleLabelsTemplates.xc (I'm simply copying "totalHP", renaming the label, and changing the "updateEvent"):
"totalDamagesBlocked": {
"enabled": true,"updateEvent": "PY(ON_TOTAL_EFFICIENCY)",
"x": 0, "y": 30, "screenHAlign": "center", "align": "center",
"shadow": { "distance": 1, "angle": 90, "alpha": 80, "blur": 5, "strength": 1.5 },
"textFormat": { "font": "mono", "size": 18, "align": "center" },
"format": "{{py:xvm.totalDamagesBlocked}}"
},5. There are 6 lines within the definition above. Here's what they do:
line 1: toggles your label on or offline 2: determines when the label contents update (see \res_mods\mods\shared_resources\xvm\doc\extra-field.txt)
line 3: deals with the positioning of your label on the screen
line 4: formats the shadow displayed
line 5: formats the text displayed
line 6: determines the contents of the text displayed
6. Tinker with lines 3-5 of the definition above to achieve your desired outcome. For the options available, see extra-field.txt (path as above).7. Repeat paragraphs 4-6 for each of the other labels you want to create.
IV. Advanced functions
8. The example you posted has a number of advanced functions which you may not even need:
"hotKeyCode": 56, "onHold": "true", "visibleOnHotKey": false,
hotKeyCode 56 = left Alt (see hotkeys.xc). The above hides the label when left Alt is held down.
"x": "{{py:math.sum({{pp.widthLeft}},80)}}",
The "x" value is 80 greater than the width of the playersPanel; it varies depending on which mode you choose.
"y": "{{py:xvm.screenHeight<950?{{py:math.sub({{py:xvm.screenHeight}}, 100)}}|0}}",
The "y" value depends on whether screenHeight is less than 950.
If yes, "y" value is screenHeight minus 100. If no, "y" value is 0.
(This makes no sense to me btw.)
"alpha": "{{py:xvm.totalAssist>0?100|60}}",
The transparency value depends on whether you have any assisted damage.
If so, the label is fully opaque. If not, the label is translucent."screenHAlign": "{{py:xvm.screenWidth>1701?left|center}}",
The label aligns to the left if screenWidth > 1701. If not, it aligns to the center.
(This also makes no sense to me btw.)
"textFormat": {"color": "{{py:xvm.totalAssist>0?0xFFCC66|0xFFFFFF}}", "font": "$TitleFont", "size": 20, "align": "left", "bold": false },
The text colour value depends on whether you have any assisted damage.
If so, the colour is orange. If not, it is white.
"shadow": ${ "def.textFieldShadow" }
The formatting of the shadow is contained in another label "textFieldShadow" within the same file battleLabelsTemplates.xc9. Don't worry about the advanced functions until you get your basic label working. I don't even use much of these myself.
-
2
-
-
Not quite sure what to help you with...
Are you saying that:
i. the example was created by you and somehow it doesn't work the way you want it to, and that's preventing you from working on the rest?
ii. the example was created by someone else and it works, and you want to understand how it works so you can apply it to the rest?
iii. something else altogether?
-
1
-
-
Thanks for the quick tutorial on how to use NDO's .py file. I followed the steps, added your code to my configs, and now understand what you wanted to achieve.
I note however that:
i. in your code "align": "right" doesn't work, probably because you used "screenHAlign": "center"
ii. the above means that "x" = the horizontal midpoint of all the bars, and the inner edges are 70 units away from the middle of the screen
iii. the background bars don't actually require an "updateEvent" (maybe that saves some processing power on weaker PCs?)
iv. the same overall effect can be achieved with the built-in macro I referred to previously, hence there is no need for additional .py files.
For point (iv) above, this is my version of your code for battleLabelsTemplates.xc:
"hpGreen": {
"enabled": true,
"updateEvent": "PY(ON_UPDATE_HP)",
"x": "{{py:sub({{py:xvm.screenHCenter}},70)}}", "y": 35,
"width": "-{{py:xvm.total_hp.ally(100)}}", "height": 15,
"bgColor": "#00ff00", "alpha": "50"
},
"hpRed": {
"$ref": { "path":"def.hpGreen" },
"x": "{{py:add({{py:xvm.screenHCenter}},70)}}",
"width": "{{py:xvm.total_hp.enemy(100)}}",
"bgColor": "#ff0000"
},
"hpGreenBG": {
"enabled": true,
"x": "{{py:sub({{py:xvm.screenHCenter}},70)}}", "y": 35,"width": "-100", "height": 15,
"bgColor": "#888888", "alpha": "50"
},
"hpRedBG": {
"$ref": { "path":"def.hpGreenBG" },
"x": "{{py:add({{py:xvm.screenHCenter}},70)}}","width": "100"
},Note that:
a. using {{py:xvm.screenHCenter}}+single.math.macro instead of "screenHAlign"+multiple.math.macros makes the positioning clearer and easier to change later
b. using negative values for ally-bar widths and positive values for enemy-bar widths achieves the same effect as "align right" and "align left" respectively
-
I set my own flag to Montenegro and it displayed properly in a replay. Screenshot here.
Check that you have the file \res_mods\mods\shared_resources\xvm\res\icons\flags\me.png?
-
1
-
-
10 hours ago, ADIX said:It's a data, ration can be calculated from total_hp / current_hp but there is no total hp data (current total_hp is "total hp left" so the current hp of the team). So the ration is needed or both the starting value of the total_hp and the current value to calculate the percentage.
{{py:xvm.total_hp.ally(100)}} gives the % of HP left on your team (i.e. current / total).
Yes there's no macro that gives you the initial HP, but maybe the above helps? Not sure what outcome you want to achieve.
(I can understand night_dragon_on's work but IDK how to use the .py file heh...)
-
Have you tried the math functions?
-
Read this thread:
-
1
-
-
11 hours ago, sirmax said:Fixed
Confirmed that 7952 addresses the problem I highlighted.
Separately, has nobody noticed in this commit (https://bitbucket.org/XVM/xvm/commits/c31572ccdf75779ee2d3927f01dd8c50f65f340e) that in alpha.xc the "eff", "wtr", "wn8" and "wgr" sections still refer to color instead of alpha?
Example:
"eff": [
{ "value": 598, "color": ${"alphaRating.very_bad" } },...
-
So they learn to target those with stats deliberately hidden. No difference?
-
4
-
-
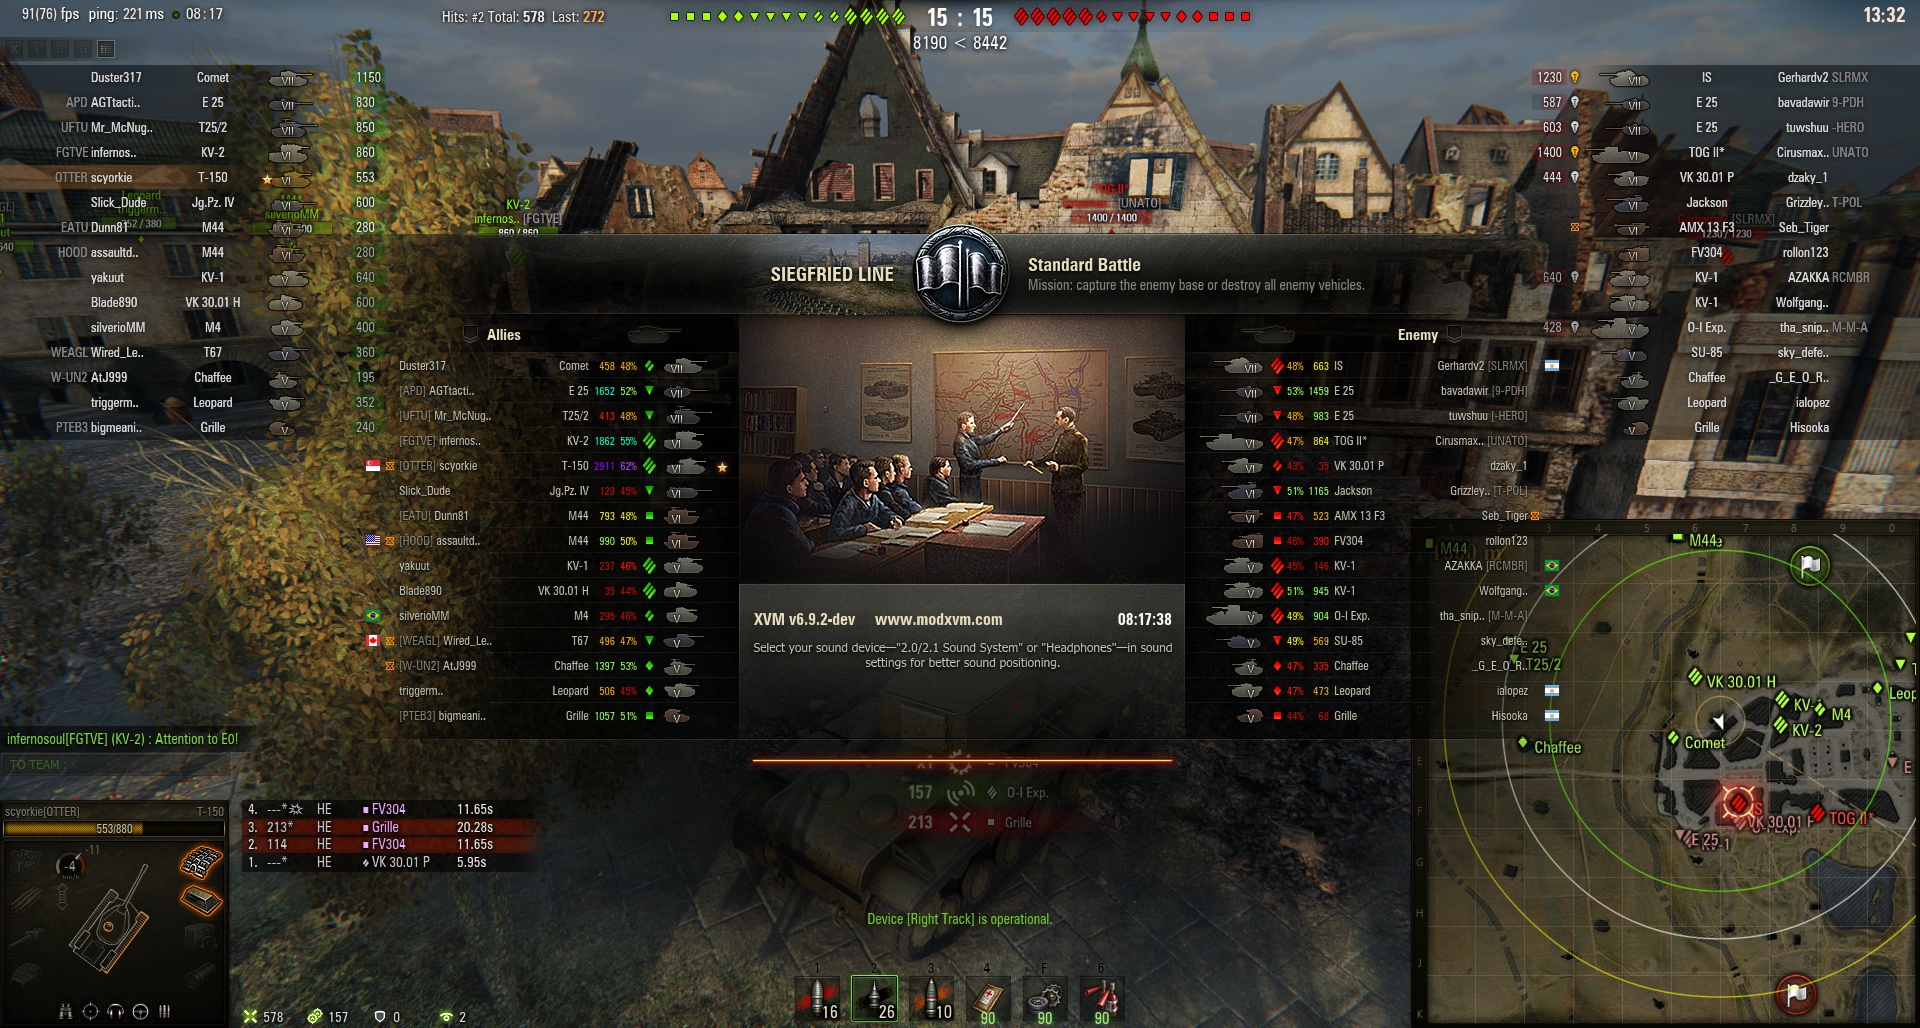
See attached screenshot: battleLoading does not go away in replays.
Logs are also attached.
Reverting to 7925 for now.
Note: I did not test 7936 in an actual battle. Let me know if you need me to.

XVM
in XVM: English Support and Discussions
Posted
9.20.1 started on NA, but no sign of 9.21 :)